10 Minutes from First Line of Code to Live Deployment: A Super Fast FastAPI Blog Course
Wenhao Wang
Dev Intern · Leapcell
This is a crash course for FastAPI. In this tutorial, we will use Python FastAPI to build a blog, from the first line of code to deployment, in just a few simple steps and under 10 minutes.
The reason it's so fast is that this tutorial won't delve into every concept in depth. Instead, it will guide you directly to build a finished product. I believe that modifying an existing product based on your own ideas is the most efficient way to master a new framework.
This blog is a purely backend logic and rendering project, using a common technology stack for Python web development:
- FastAPI + Uvicorn
- PostgreSQL
- SQLModel: For interacting with the database from code.
- Jinja2: A template engine for rendering frontend pages.
Without further ado, let's get started:
1. Initialize the Project
Execute the following commands in your terminal:
# 1. Create and enter the project directory
mkdir fastapi-personal-blog && cd fastapi-personal-blog

# 2. Create and activate a virtual environment
python -m venv venv
source venv/bin/activate
Create a requirements.txt file and add the following dependencies:
# requirements.txt
fastapi
uvicorn[standard]
sqlmodel
psycopg2-binary
jinja2
python-dotenv
python-multipart
Then, install them:
pip install -r requirements.txt
2. Connect to a PostgreSQL Database
Next, we will integrate a PostgreSQL database.
Set up the database
To speed up the tutorial, we will skip the step of installing and setting up a database locally. Instead, we'll provision an online database directly.
We can create a free database with one click on Leapcell.

After registering an account on the website, click "Create Database".

Enter a Database name, select a deployment region, and you can create the PostgreSQL database.
On the new page that appears, you will find the information needed to connect to the database. A control panel is provided at the bottom, allowing you to read and modify the database directly on the webpage.

In the connection information on the new page, find the Connection String. We will use it shortly.
Configure the database connection
Create a .env file in the project's root directory to store sensitive connection information. Paste the URL you obtained from Leapcell into it.
# .env
DATABASE_URL="postgresql://user:password@host:port/dbname"
Next, create a database.py file to handle the database connection:
# database.py
import os
from sqlmodel import create_engine, SQLModel, Session
from dotenv import load_dotenv

load_dotenv()

DATABASE_URL = os.getenv("DATABASE_URL")

engine = create_engine(DATABASE_URL)

def create_db_and_tables():
    SQLModel.metadata.create_all(engine)

def get_session():
    with Session(engine) as session:
        yield session
3. Create the Post Module
Next, let's implement the logic related to blog posts.
Create a models.py file in the project's root directory to define the data model.
# models.py
import uuid
from datetime import datetime
from typing import Optional
from sqlmodel import Field, SQLModel

class Post(SQLModel, table=True):
    id: Optional[uuid.UUID] = Field(default_factory=uuid.uuid4, primary_key=True)
    title: str
    content: str
    createdAt: datetime = Field(default_factory=datetime.utcnow, nullable=False)
SQLModel will automatically map this class to a post table in the database. The create_db_and_tables function will ensure this table is created when the application starts, so there's no need to execute SQL manually.
4. Set Up Jinja2 for Web Rendering
Set up Jinja2 to render the HTML website.
Create the Directory Structure
Create templates and public folders in the project's root directory. The templates folder will store HTML files, and the public folder will store static assets like CSS and JavaScript.
The final project structure will look like this:
- fastapi-personal-blog
    - templates
    - public
    - .env
    - database.py
    - models.py
    - requirements.txt
Implement the Frontend Pages
Create the following files inside the templates folder:
-
_header.html(reusable header)<!DOCTYPE html> <html lang="en"> <head> <meta charset="UTF-8" /> <meta name="viewport" content="width=device-width, initial-scale=1.0" /> <title>{{ title }}</title> <link rel="stylesheet" href="/static/css/style.css" /> </head> <body> <header> <h1><a href="/">My Blog</a></h1> <a href="/posts/new" class="new-post-btn">New Post</a> </header> <main></main> </body> </html> -
_footer.html(reusable footer)</main> <footer> <p>© 2025 My Blog</p> </footer> </body> </html> -
index.html(blog homepage){% include "_header.html" %} <div class="post-list"> {% for post in posts %} <article class="post-item"> <h2><a href="/posts/{{ post.id }}">{{ post.title }}</a></h2> <p>{{ post.content[:150] }}...</p> <small>{{ post.createdAt.strftime('%Y-%m-%d') }}</small> </article> {% endfor %} </div> {% include "_footer.html" %} -
post.html(post detail page){% include "_header.html" %} <article class="post-detail"> <h1>{{ post.title }}</h1> <small>{{ post.createdAt.strftime('%Y-%m-%d') }}</small> <div class="post-content">{{ post.content | replace('\n', '<br />') | safe }}</div> </article> <a href="/" class="back-link">← Back to Home</a> {% include "_footer.html" %} -
new-post.html(new post page){% include "_header.html" %} <form action="/posts" method="POST" class="post-form"> <div class="form-group"> <label for="title">Title</label> <input type="text" id="title" name="title" required /> </div> <div class="form-group"> <label for="content">Content</label> <textarea id="content" name="content" rows="10" required></textarea> </div> <button type="submit">Submit</button> </form> {% include "_footer.html" %}
Add CSS Styles
In the public directory, create a css folder, and inside it, create a style.css file. The styles are consistent with the original article.
/* public/css/style.css */
body {
  font-family: sans-serif;
  line-height: 1.6;
  margin: 0;
  background-color: #f4f4f4;
  color: #333;
}
header {
  background: #333;
  color: #fff;
  padding: 1rem;
  display: flex;
  justify-content: space-between;
  align-items: center;
}
header a {
  color: #fff;
  text-decoration: none;
}
main {
  max-width: 800px;
  margin: 2rem auto;
  padding: 1rem;
  background: #fff;
  border-radius: 5px;
}
.post-item {
  margin-bottom: 2rem;
  border-bottom: 1px solid #eee;
  padding-bottom: 1rem;
}
.post-item h2 a {
  text-decoration: none;
  color: #333;
}
.post-detail .post-content {
  margin-top: 1rem;
}
.new-post-btn {
  background: #5cb85c;
  padding: 0.5rem 1rem;
  border-radius: 5px;
}
.post-form .form-group {
  margin-bottom: 1rem;
}
.post-form label {
  display: block;
  margin-bottom: 0.5rem;
}
.post-form input,
.post-form textarea {
  width: 100%;
  padding: 0.5rem;
}
.post-form button {
  background: #337ab7;
  color: #fff;
  padding: 0.7rem 1.5rem;
  border: none;
  cursor: pointer;
}
footer p {
  text-align: center;
}
5. Write the Main Application Logic
Finally, create a main.py file in the project's root directory. This file is the entry point for the entire application and will integrate the database, routing, and template logic.
# main.py
import uuid
from contextlib import asynccontextmanager
from fastapi import FastAPI, Request, Depends, Form
from fastapi.responses import HTMLResponse, RedirectResponse
from fastapi.staticfiles import StaticFiles
from fastapi.templating import Jinja2Templates
from sqlmodel import Session, select

from database import create_db_and_tables, get_session
from models import Post

# Create database tables on application startup
@asynccontextmanager
async def lifespan(app: FastAPI):
    print("Creating tables..")
    create_db_and_tables()
    yield

app = FastAPI(lifespan=lifespan)

# Mount the static files directory
app.mount("/static", StaticFiles(directory="public"), name="static")

# Set up the Jinja2 templates directory
templates = Jinja2Templates(directory="templates")

@app.get("/", response_class=HTMLResponse)
def root():
    # Redirect the root path to the post list
    return RedirectResponse(url="/posts", status_code=302)

@app.get("/posts", response_class=HTMLResponse)
def get_all_posts(request: Request, session: Session = Depends(get_session)):
    # Query all posts, ordered by creation time descending
    statement = select(Post).order_by(Post.createdAt.desc())
    posts = session.exec(statement).all()
    return templates.TemplateResponse("index.html", {"request": request, "posts": posts})

@app.get("/posts/new", response_class=HTMLResponse)
def new_post_form(request: Request):
    # Display the form page for creating a new post
    return templates.TemplateResponse("new-post.html", {"request": request, "title": "New Post"})

@app.post("/posts", response_class=HTMLResponse)
def create_post(
    title: str = Form(...),
    content: str = Form(...),
    session: Session = Depends(get_session)
):
    # Receive data from the form and create a new post
    new_post = Post(title=title, content=content)
    session.add(new_post)
    session.commit()
    return RedirectResponse(url="/posts", status_code=302)

@app.get("/posts/{post_id}", response_class=HTMLResponse)
def get_post_by_id(request: Request, post_id: uuid.UUID, session: Session = Depends(get_session)):
    # Query and display a single post by ID
    post = session.get(Post, post_id)
    return templates.TemplateResponse("post.html", {"request": request, "post": post, "title": post.title})
6. Run the Blog
At this point, your blog development is complete. Run the following command in the terminal to start the blog:
uvicorn main:app --reload
The --reload parameter automatically restarts the server when you modify the code, which is convenient for development and debugging.
Open http://localhost:8000 in your browser to see your blog's homepage. You can create a new post to test all the features!


7. Deploy the Blog Online
Now you might be thinking, how can I show the website I made to others so that everyone can access it?
Remember Leapcell, which we used to create the database earlier? Leapcell can do more than just create databases; it's also a web app hosting platform that can host projects in various languages and frameworks, including FastAPI, of course.
Follow the steps below:
- Commit your project to GitHub. You can refer to GitHub's official documentation for the steps. Leapcell will pull the code from your GitHub repository later.
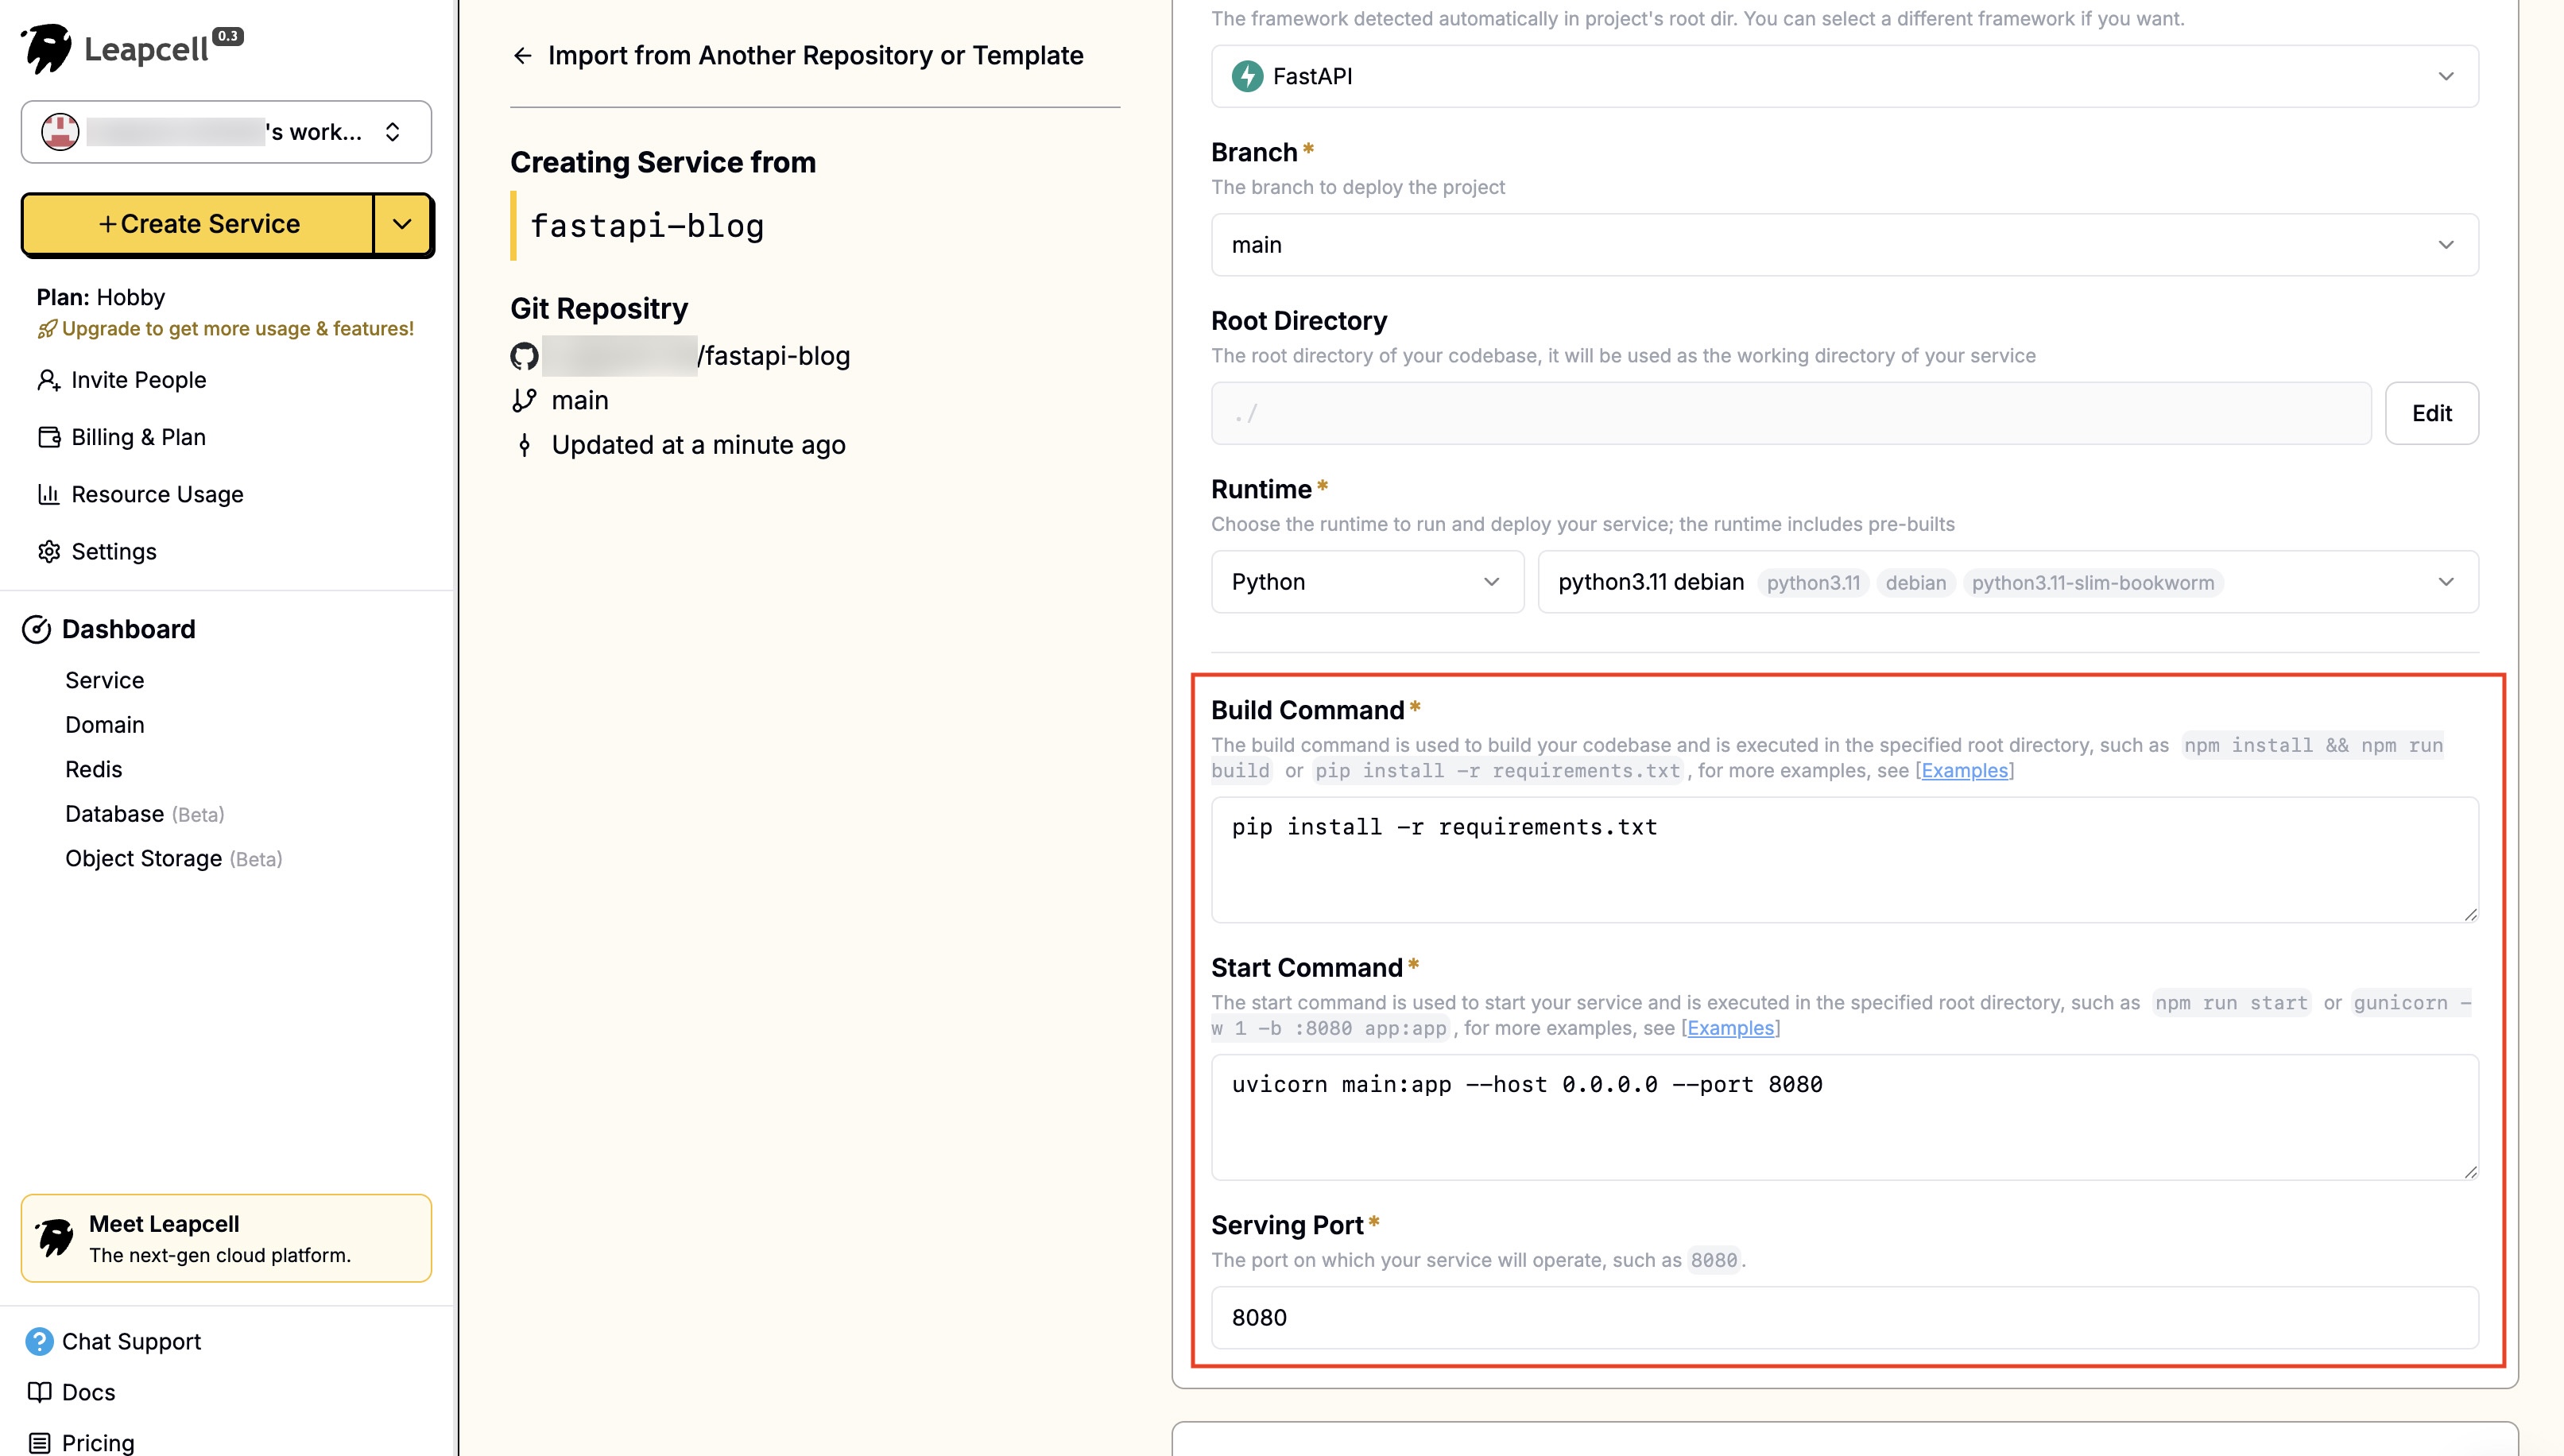
- Click "Create Service" on the Leapcell page.

- After choosing your FastAPI repo, you'll see Leapcell has auto-populated the necessary configurations.
- You still have to fill environment variables on your own. Set the
DATABASE_URLto the same value as in your.envfile.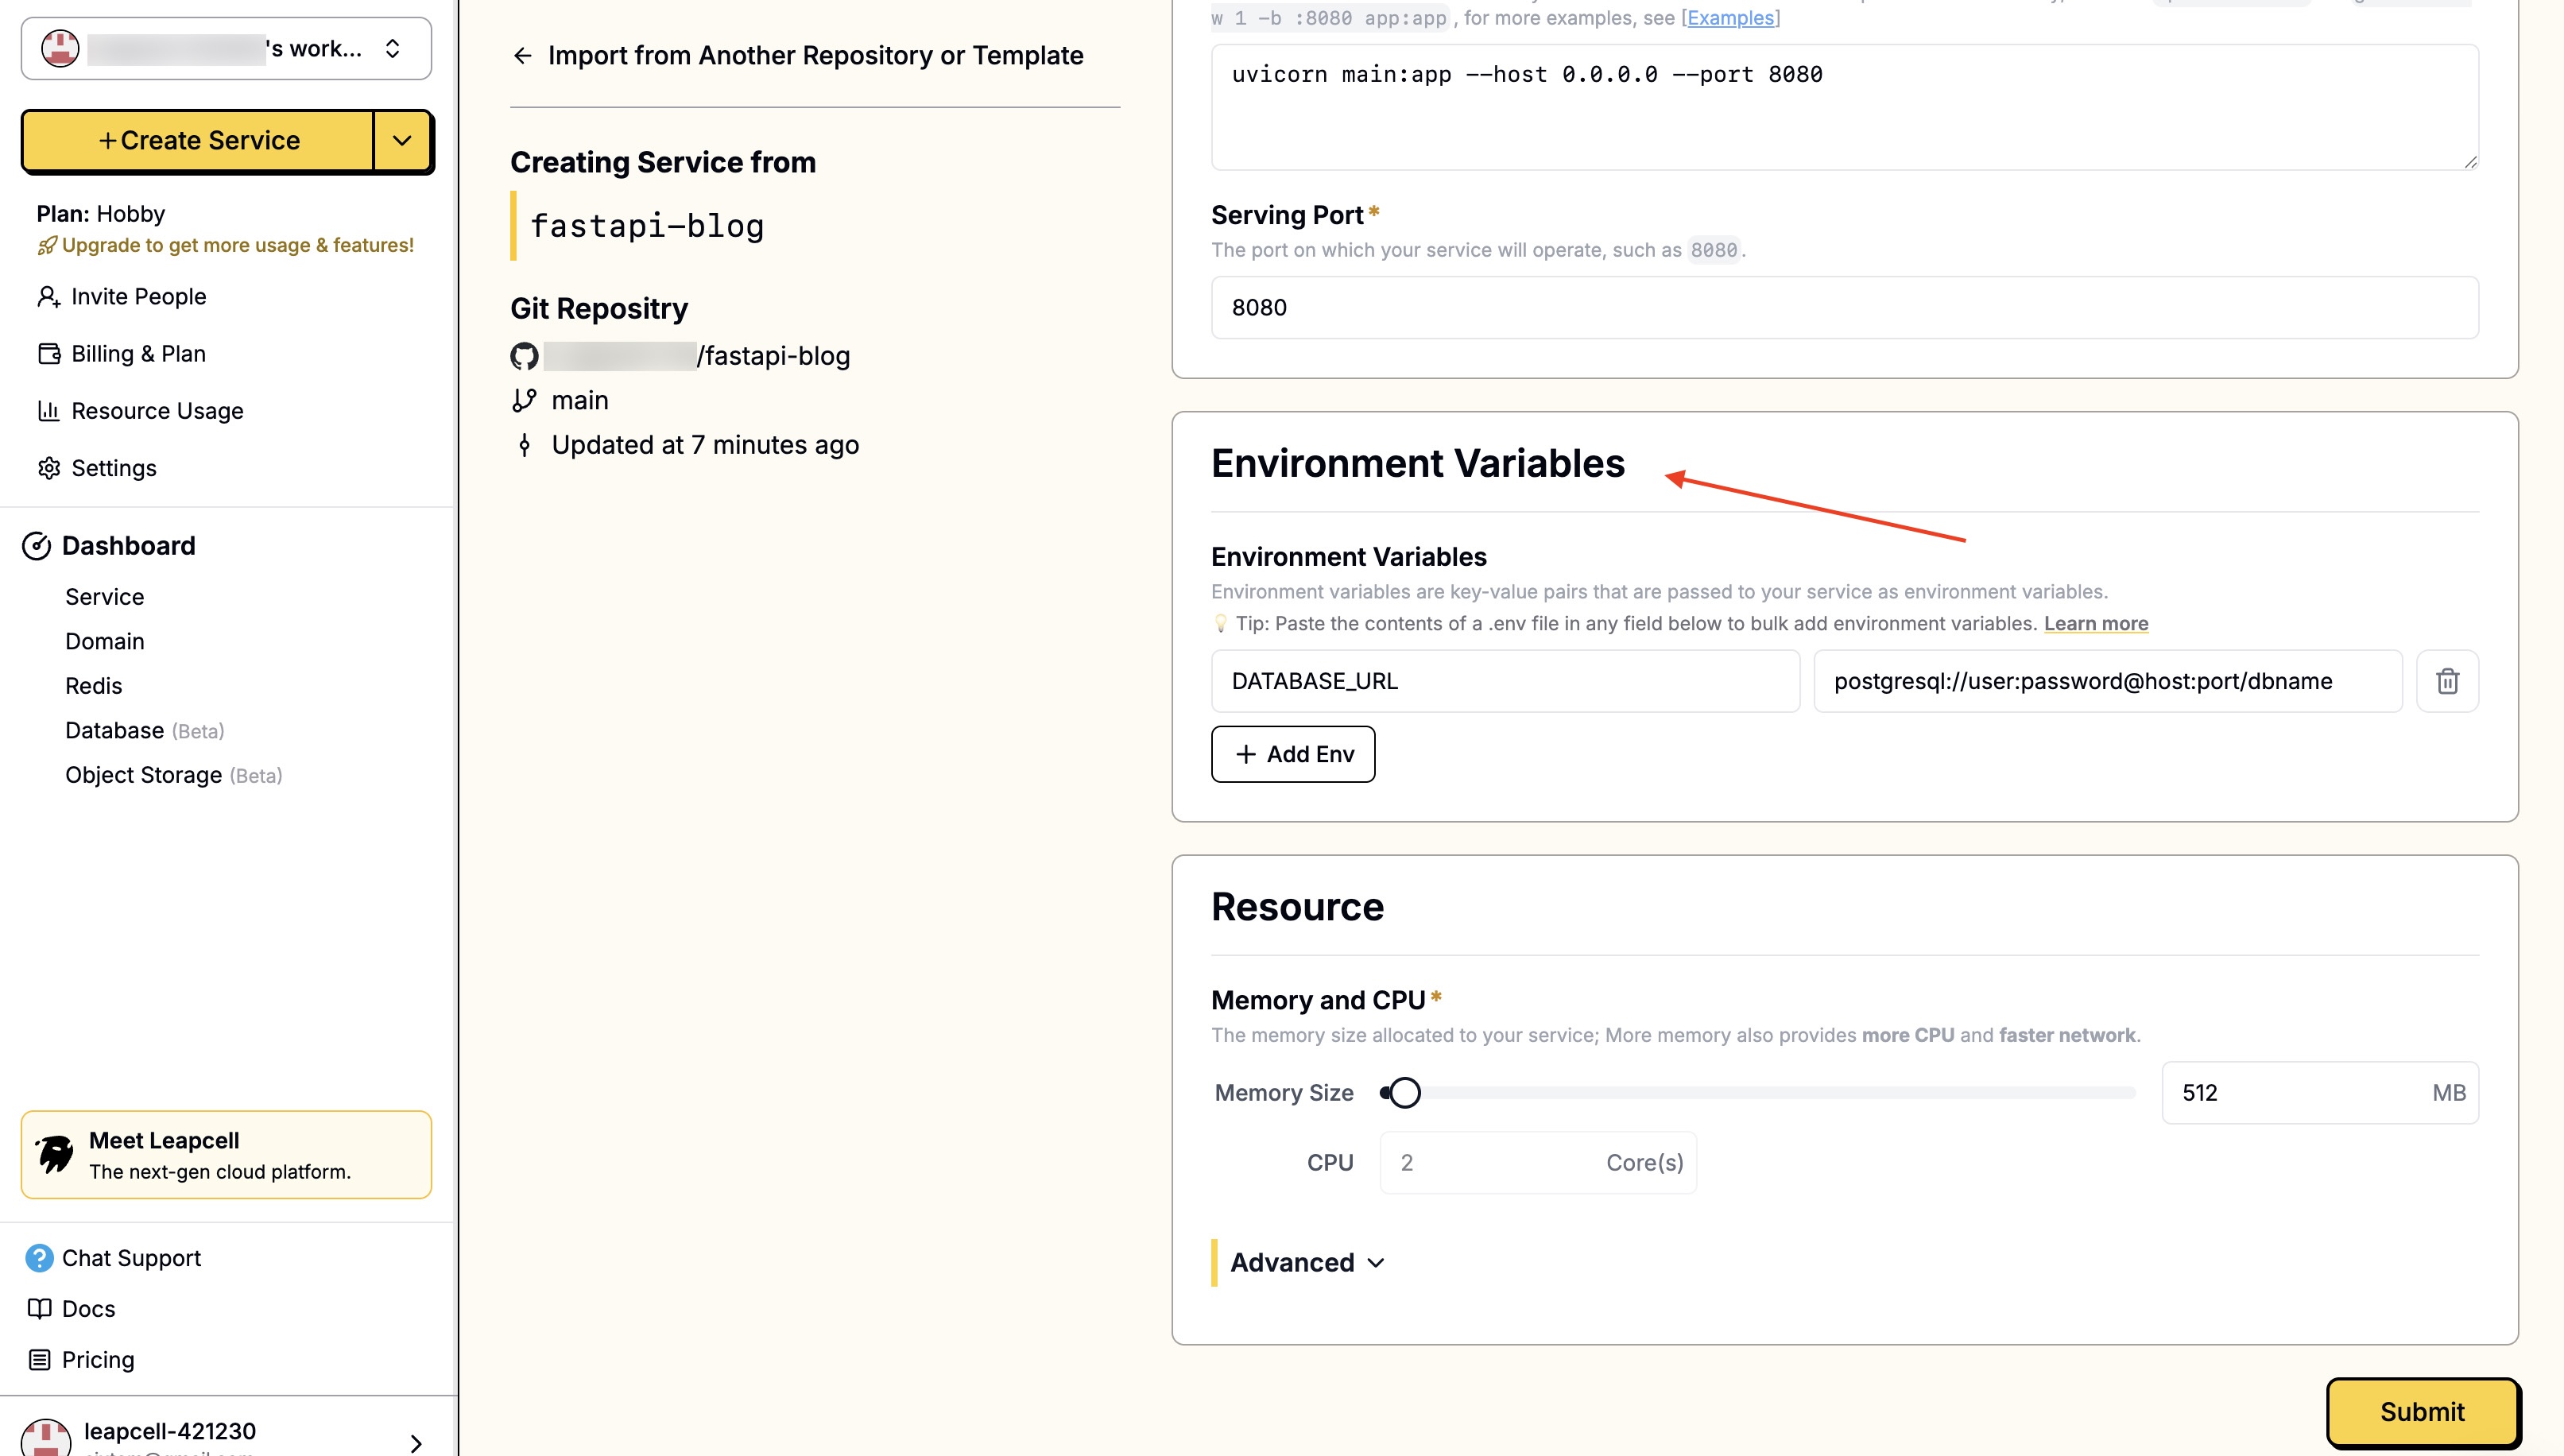
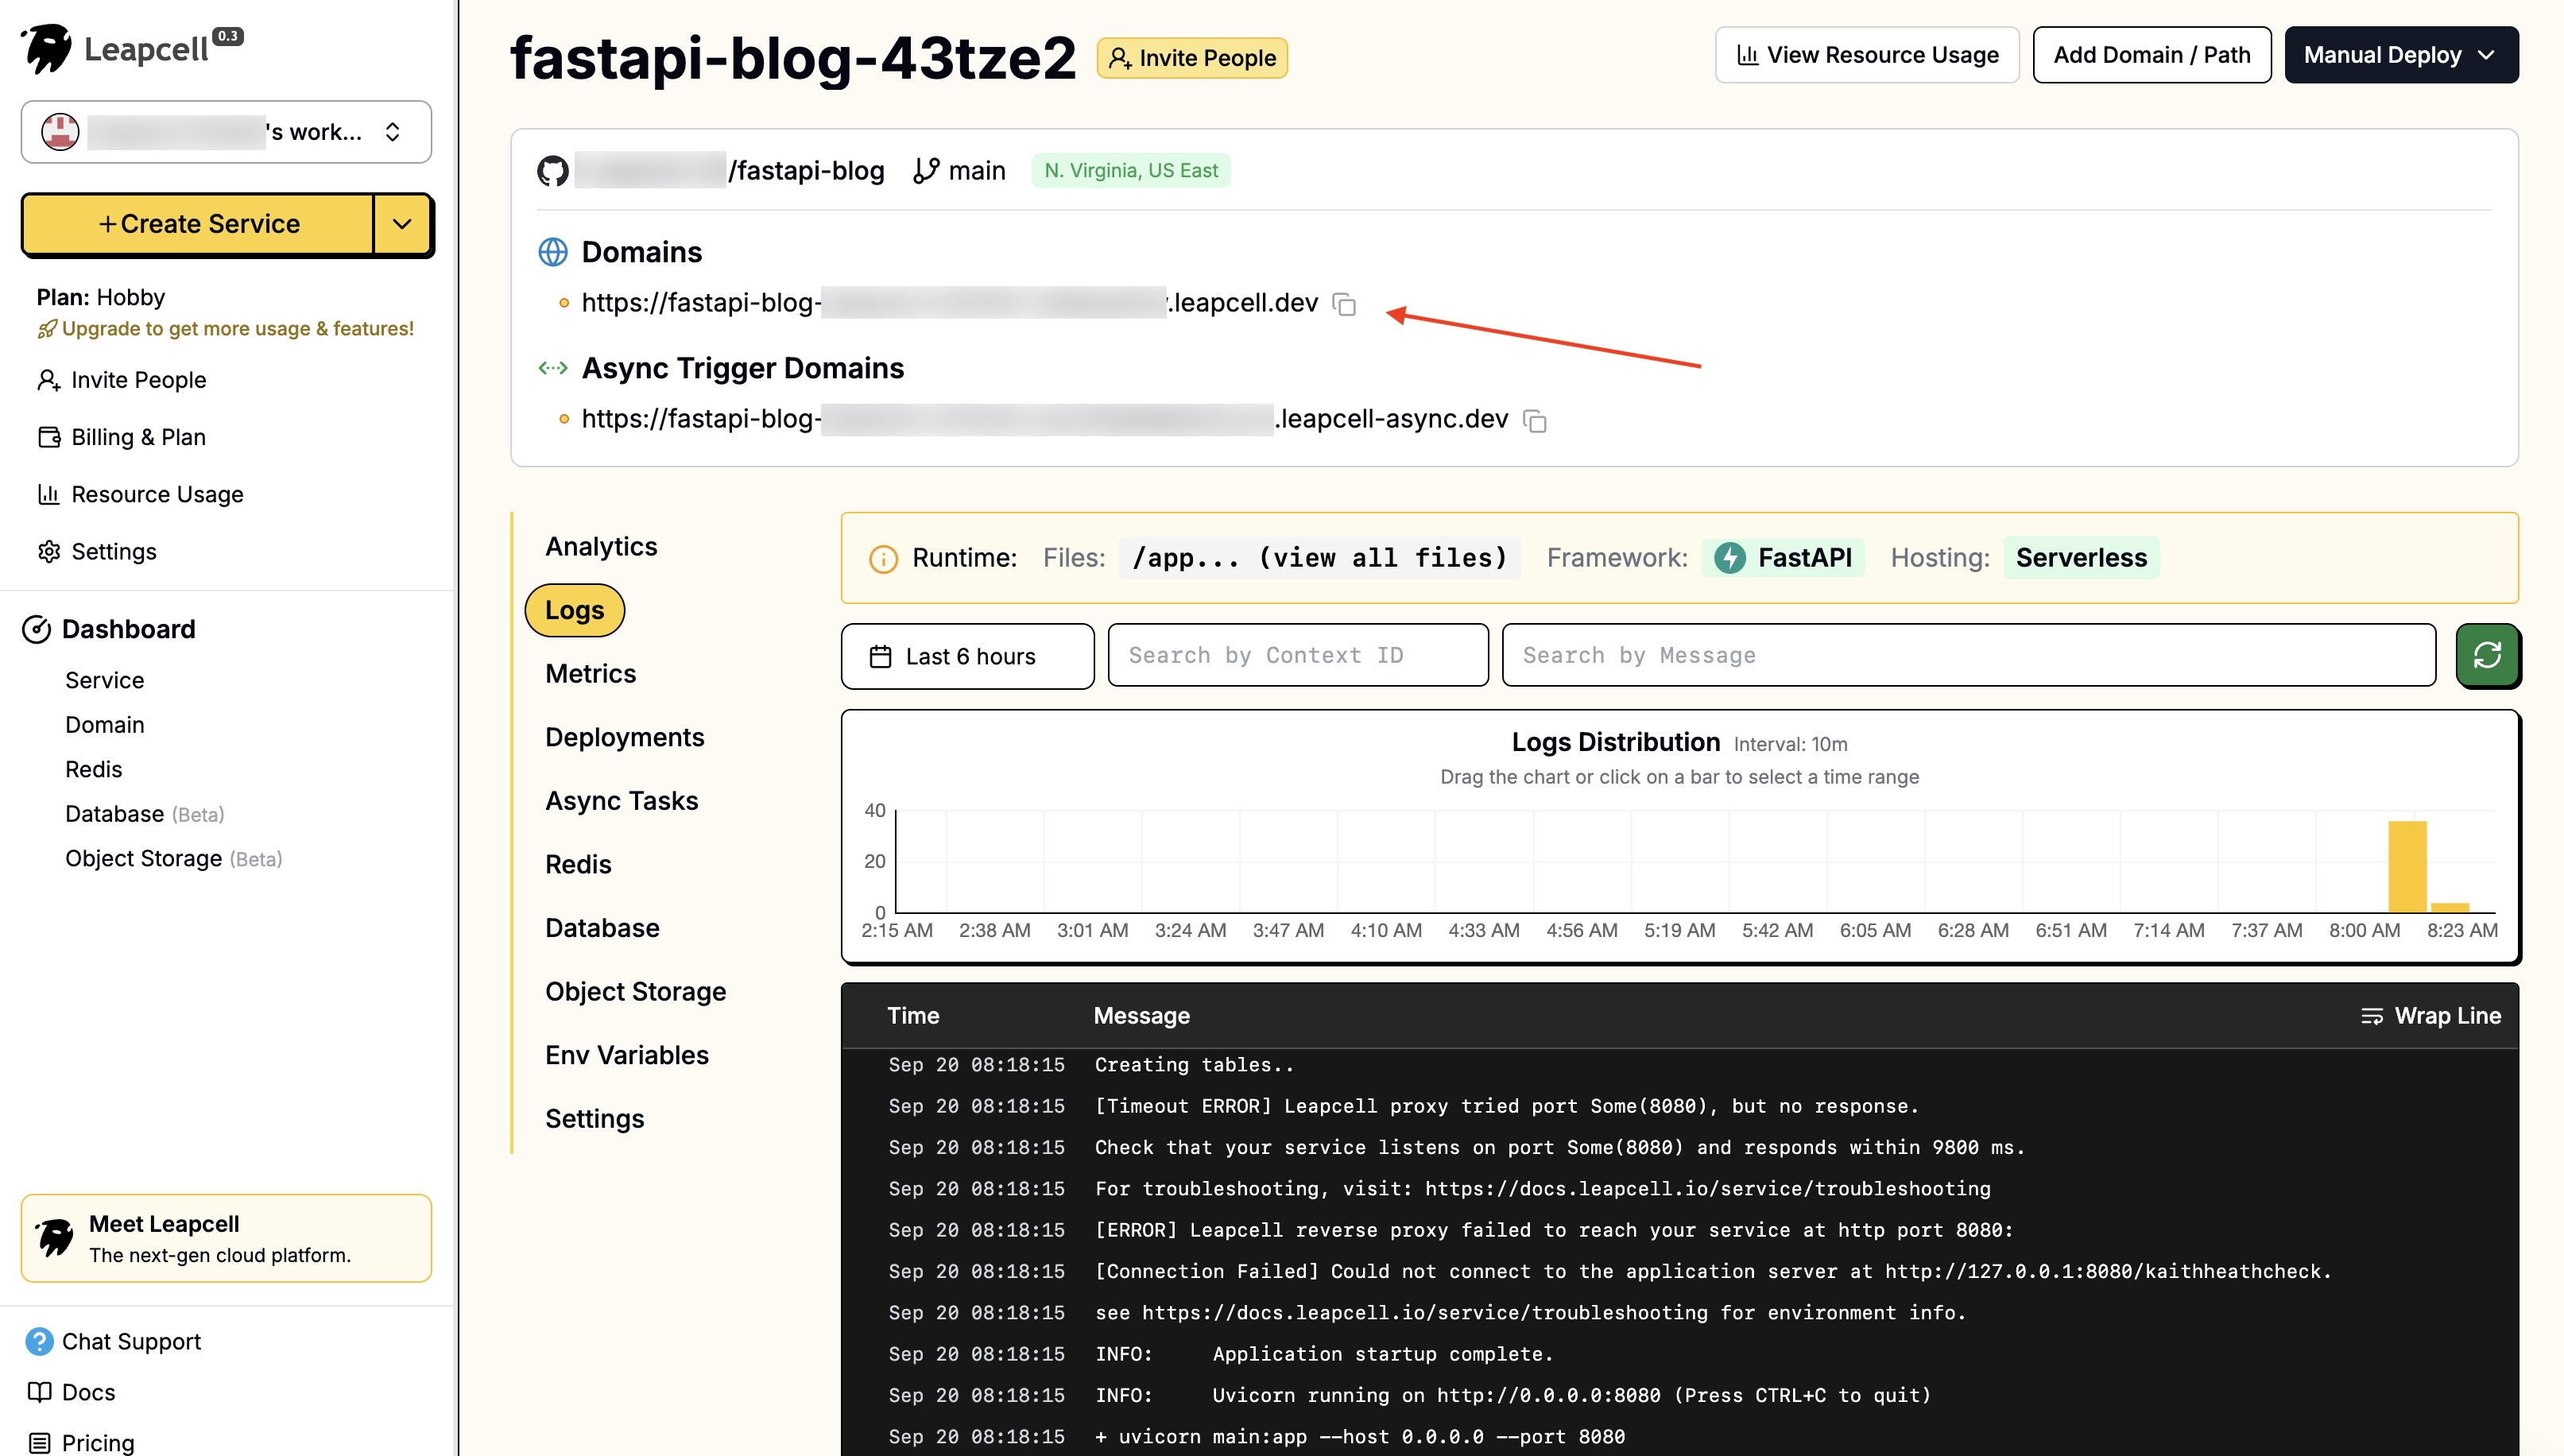
- Click "Submit" at the bottom to deploy. The deployment will complete quickly and return you to the deployment homepage. Here we can see that Leapcell has provided a domain. This is the online address of your blog.
Now, you can share this link with your friends, and everyone can see your blog online!